Edit: Just now I read in the "ELV journal 5/2014 p.47" that this technique is called "Charge-Transfer-Acquisition-Principle". It is mainly used in connection with capacitive touch buttons. ST www.st.com builds controllers for this kind of applications. Search for "capacitive touch" on their website.
This is how it is supposed to work:
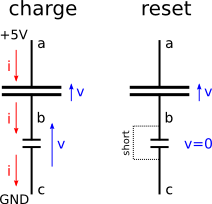 |
| Figure 1: principle of capacity measurement |
It might be difficult to make absolute measurements of capacitance with this technique. But that is not needed if only variations in capacitance are of interest. The first application that comes to mind are capacitive touch buttons. I believe there are many other interesting things that can be done with this.
In that article, the procedure was realized by connecting the tree points of the circuit to I/O pins of a microcontroller.
I connected the points a,b and c in Fig. 1 to the ATMEGA8 at pins PC2, PC1 and PC0 respectively. As large cap, I used 145 nF (multimeter measurement), and for the small one I use a 10 nF.
The rest is done in the firmware. The program has to switch the three pins to the right sequence. I consider the big capacitor to be "full" when the voltage (after discharging the small one) at point a is recoginzed as "high" by the microcontroller.
To initialize a new measurements, both capacitors have to be discharged. this is ensured by putting all three points to GND and wait a bit:
// discharge both caps
PORTC &= ~((1<<PC0) | (1<<PC1) | (1<<PC2)); // PORTC = ?????000
DDRC |= (1<<DDC0) | (1<<DDC1) | (1<<DDC2); // DDRC = ?????111
_delay_us(50);
After this, I go to the reset step in Fig. 1: b and c connected to GND (shorted) and a configured as input. A has to be configured as input (high impedance) to prevent it from loosing any charge.
DDRC ^= (1<<DDC2);
After initializing, the charge and reset states have to be repeated until the big cpacitor is full. The chargin step is achieved by the following:
- disconnect b from GND (make it an input) DDRC ^= (1<<DDC1);
- connect point a to +5V (VCC), i.e. set it to 1 PORTC ^= (1<<PC2); Note that point a is still an input, but writing 1 to the PORTC:2 bit enables the pull-up resistor which is charging the two capacitors
- wait until the small capacitor is full, i.e. point b is above the threshold to be deteced as high PORTC ^= (1<<PC2);
- disconnect the pull-up connection to VCC from point a. This prevent the big capacitor from loosing any charge PORTC ^= (1<<PC2);
- put point b to GND to discharge the small capacitor, as it was done at the end of the initialization DDRC ^= (1<<DDC1);
All these steps are just done by swapping the correct bits in either PORTC or DDRC using XOR operations.
After each charge-reset cycle, one can test if the big capacitor is already charged, i.e. if point a is 1:
(PINC & (1<<PC2)); // condition to end the measurement
Here are the voltage traces of point a and point b on the oscilloscope:
 |
| Figure 2: The voltages at point a (purple) and point b (blue) |
Fig. 2 shows all cycles of one measurement. Each spike is one cycle. One can see how the lower end of the purple (point a) line is higher after each cycle because the big capacitor carries more and more charge. Nine cycles are needed to complete the measurement. The bigger the difference between the two capacitors, the more cycles are needed and the more sensitive is the measurement.
The technique really works nicely and reliably. However, measuring 10 nF can be still done with my multimeter. But this method scales down to much smaller capacitors. I tried a 10 nF as big capacitor, and nothing at all as small capacitor ( there is the capacitance of the breadboard lines): I could see difference in number of cycles by putting a 2pF capacitor.
It is nice to have an oscilloscope to see what is going on. If You don't have one, you can output the number of cycles as a binary number, using LEDs.
It is nice to have an oscilloscope to see what is going on. If You don't have one, you can output the number of cycles as a binary number, using LEDs.
The hardware is trivial (no picture this time). Here is the complete firmware:
#define F_CPU 1000000
#include <avr/io.h>
#include <util/delay.h>

//
// PC2 -----|
//          |
//      =========    large capacitor
//          |
// PC1 -----+
//          |
//         ===       small capacitor
//          |
// PC0 -----|
//

void initialize()
{
 // discharge both caps
 PORTC &= ~((1<<PC0) | (1<<PC1) | (1<<PC2));
 DDRC  |= (1<<DDC0) | (1<<DDC1) | (1<<DDC2);
 _delay_us(50);

 // go to state: reset (discharge small cap)
 DDRC ^= (1<<DDC2);
 // now:
 //  DDRC  = 0b?????011
 //  PORTC = 0b?????000
}
void cycle()
{
 // assume:
 //  DDRC  = 0b?????011
 //  PORTC = 0b?????000

 // go to state: charge (large cap through small cap)
 DDRC  ^= (1<<DDC1);
 // now:
 //  DDRC  = 0b?????001
 //  PORTC = 0b?????000
 PORTC ^= (1<<PC2);
 // now:
 //  DDRC  = 0b?????001
 //  PORTC = 0b?????100
 while (!(PINC & (1<<PC1)));

 // go back to state: reset
 PORTC ^= (1<<PC2);
 DDRC  ^= (1<<DDC1);

}

int main(void)
{
 DDRD  |= (1 << DDD0);
 //PORTD |= (1 << PD0);
 while(1)
 {
  // create trigger for oscilloscope visualization
  PORTD ^= (1 << PD0);

  initialize();

  int cycles;
  for (cycles = 0; !(PINC & (1<<PC2)); ++cycles) cycle();

  // create trigger for oscilloscope visualization
  PORTD ^= (1 << PD0);

  _delay_ms(10);
 }

 return 0 ;
}
Keine Kommentare:
Kommentar veröffentlichen